Saturday, June 19, 2010

Latest Projects

I have been pretty busy.. I guess...   and my garage is still full of projects...  check back to see how they turn out.


I

Saturday, January 23, 2010

Room Makeover all finished.


Here is my daughters room all finished.    The walls are painted Cafe Latte and the furniture is all from yard sales or thrift stores...

The chandelier is made from an old gold & glass kitchen light .  The big glass shade was removed then the remaining fixture was spray painted white and decorated with strung acrylic beads, thrift store little lamp shades and a $2 light / chain conversion kit from Home Depot.

I'm sure my daughter will "personalize" this room with her own unique style...  but for now it's a refreshing change from her outdated  bedroom.


The only new items in this room are the bedspread, mattress and the rug... everything else is repurposed.   We stayed in our under $300. dollar budget and had alot of fun.. In the future if we want to change the  look of the room we'll have some warm but still neutral colors to start from...and if we need anything...  we'll know to go to the thrift store first.
.
 This was a really fun project ...

Thursday, January 14, 2010

Piece together a colorful mosaic table

I always think mosaic looks like a fun project,
 so I decided to give it a try.   
One day whilst hurrying thru a thrift store ( because I was supposed to be somewhere else.).  I snagged this little side table..  Mainly I liked the lion decoration on the front and since it was only $3.49......
Really who could resist.?

Once I took a good look at it when I got it home
I realized it was the perfect candidate for my mosaic project.

I had a couple brown ceramic tiles left from another project so I decided to not spend alot on this and go with a color that would match the tile I already had.  Luckily enough I found a can of Honey colored spray paint on clearance for 99 cents..!!!!  I picked one 18" light colored tile and one 6" decorative tile for the center.

After cleaning, sanding, primering, and spray painting the whole thing, I was ready to create some mosaic tiles.


The hammer worked pretty good for this..I covered the tiles with a thick layer of newspaper and pounded away...  the tiles broke into small pieces pretty easy.  Keep in mind tho that these are glass tiles and you do need to be careful.   Broken tile can be very sharp and little bits can fly around. 
Definitely wear protective eye gear.
 A trip to the emergency room can really take the fun out of your project.

I glued the center tile to the table top with tile adhesive, and then just played around with the pieces until I was pretty happy with how it all looked.   Some pieces broke with nice corner angles and straight edges so it was easy to puzzle them into a pattern...  The top of this table is plywood... to be very "handy-man" correct.. it should be masonry board because I am planning to use regular grout and it will contain moisture.. but since this is after all an experiment it's not probably worth the extra expense and hassel...  if I was doing a larger more "important" project I would go the extra step and get the masonry board for a foundation for the tile.


I glued down the rest of the pieces with the tile adhesive trying to keep it as level as possible with no sharp edges sticking up.
Let that dry for a day or two.

The grout that I used was sanded grout in a neutral beige....  I mixed it up pretty stiff, trying to make it not too sloppy since I do have the plywood table top to think about.

Here is the finished product with all the tiles grouted and 3 coats of clear gloss Minwax Polycrylic.
The plastic coating also helped to soften some of the rougher edges on the tiles


It looks pretty fabulous huh?
Worth evey cent of
$3.49.

Thursday, November 26, 2009

Room Makeover.

I can't believe my daughter is almost all grown up...it seems like she was just getting new a Barbie comforter set  for Christmas  last year???   Actually it was more like 12 years ago...LOL   Now that she's 18 it's definitely time to update the look of her bedroom. .

What we're going for is something in between Cosmo Girl & Pottery Barn.

First we had to take down tons of posters and stickers on the walls and fill all the pinholes.  Next we applied a coat of primer to cover some unauthorized "Sharpie" drawings.   Some scrubbing and a little primer later we have nice clean walls to work with.
This  "makeover" will include  .. new paint,  a new bed,  comforter, area rug, lamps and a coat of paint on all the furniture.  Some items we'll look for at the Goodwill and some from Ross and Target and maybe WalMart...   our budget for this room hopefully will be under $300.00 dollars..   including the furniture.   The twin mattress we got from Bedmart at their $99.00 sale

The bed is a Pottery Barn style with a bookcase headboard and a large drawer that pulls out from underneath.. it's a twin bed so we are going for sort of a daybed look, plus it gives her more space in the room. .. The sheet set came with a bed skirt... we don't need that.. so the material from the bed skirt was used to create decorative throw pillows for the bed.


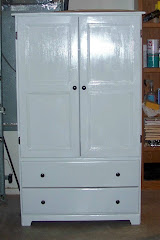
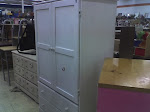
What we have already is a Bohemian comforter set from Ross...$19.00 includes comforter, sheets, pillowcase, pillow shams... The bed we got at a yard sale for $40.00. The armoire that houses her TV and movies, games etc. is from the Goodwill $20.99.  A fresh coat of white paint and new knobs spruced it up quite nicely.
                               The comforter is turquoise, brown, pink and white.


                                                                                                       This looks so cute.. this was a dark wooden chair..$3.49.  I sprayed it turquoise and used a brown satiny napkin to recover the seat.. snazzy huh? It will match  this bedroom perfect.
 Plus as an added bonus the nakpins came in a package of 6...  that's enough for a couple more pillows. You can never have to many pillows .. Right?

The room already had a little unfinished wash stand, we painted that Coffee Bean Brown and added a mirror from the thrift store that cost $10.99. We also put on dark brass drawer pulls that match the armoire  and topped the whole thing off with a coat of clear plastic Minwax Semi-Gloss .
The paint we chose for this room is Glidden's Cafe Latte, with white trim on the baseboards and door.
A big brown shaggy area rug and some accessories from here and there and it will be perfect.

Wednesday, November 25, 2009

Barstool anyone?


This unfinished barstool caught my eye when I made a quick trip around the Goodwill one day.. it cost $5.99.

I have similar barstools already that are backless...  so I thought this would make a good Bartender Stool.

The color I chose for it is Mahogney Red.

Sunday, November 22, 2009

Girly little Guest room comprised of all thrift store finds


Comforter $19.99,
Bedframe $14.99,
 Lamp $4.99,
Shams $3.99,
Sheets $5.99,
Mattress $24.99,
4 pillows $1.99 each,
Mirror $12.99,
 Bedskirt $5.99,
                                                        Vanity $7.50.

Cute Little Quickie


Here's a little quickie.. This is a cute little side table.. all it needed was a fresh coat of varnish on the top... once I got it home it took about a half hour... I got out my trusty Makita sander and sanded down the top..then I realized I had no stain... so guess what? I used my Old English Scratch remover furniture polish and it worked great.. That scratch remover "stained" the top of this table perfectly.. Two coats of Polycrylic and TAA- DAA.. this little table is ready for it's new home.


See how great it looks. ?  and it was only $10.99